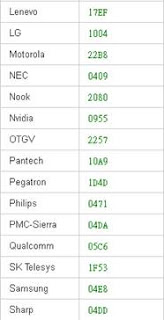
1. Add the Vendor ID to $HOME\USERNAME\.android\adb_usb.ini
Win XP: C:\Documents and Settings\%USERNAME%
2. Get the Device Vendor ID and Product ID from Device Management
2. Modify the android_winusb.inf
(Get the Android USB OEM Driver from Android SDK folder \ extras\usb_driver)
Add the Device Vendor ID/ Product ID to [Google.NTx86] and [Google.NTamd64]
INF of Driver Installation
Reference: http://developer.android.com/sdk/win-usb.html
To install the Android USB driver on Windows XP for the first time:
- Connect your Android-powered device to your computer's USB port. Windows will detect the device and launch the Hardware Update Wizard.
- Select Install from a list or specific location and click Next.
- Select Search for the best driver in these locations; un-check Search removable media; and check Include this location in the search.
- Click Browse and locate the USB driver folder. (The Google USB Driver is located in <sdk>\extras\google\usb_driver\.)
- Click Next to install the driver.
To install the Android USB driver on Windows 7 for the first time:
- Connect your Android-powered device to your computer's USB port.
- Right-click on Computer from your desktop or Windows Explorer, and select Manage.
- Select Devices in the left pane.
- Locate and expand Other device in the right pane.
- Right-click the device name (such as Nexus S) and select Update Driver Software. This will launch the Hardware Update Wizard.
- Select Browse my computer for driver software and click Next.
- Click Browse and locate the USB driver folder. (The Google USB Driver is located in <sdk>\extras\google\usb_driver\.)
- Click Next to install the driver.


沒有留言:
張貼留言